Thursday, February 8, 2018

What happened to the Maharaj Shivaji’s Swords

Chhatrapati Shivaji Maharaj was the great warrior of 17th century, born in India. He started his mission to form a Hindu kingdom (hindavi swarajya) in his early childhood, at the age of fifteen. In his life he captured & built about 350 hill forts & coastal forts. He also formed a strong navy to protect costal region of western India. Today he is called as the father of Indian navy.

Artisera_Fine-Art_Olegraphs_Raja-Ravi-Varma-Press_Shivaji-Maharaj_1_2048x2048

He brought revolution in traditional Maratha weapons. This development was the only thing, which took Marathas to the victory

Shivaji Maharaj did not use just a single sword during his career. He had 3 swords namely- 1) Bhawani 2) Tulja 3) Jagdamba.

Let’s hear out the story of each sword.

1. BHAWANI

The year was 1659. A port named Banda near the Konkan coast had a Portuguese ship stuck on it due to shallow waters. A resident of that region and a soldier of Shivaji Maharaj by the name Ambaji Sawant raided that Portuguese ship and found in it an impeccable, stone studded European sword.

During that period Shivaji Maharaj was on a tour of the Konkan region. He visited the Saptakoteshwar temple in the region and there Ambaji’s son Krushnaji Sawant met Shivaji Maharaj. Overwhelmed by the presence of such a great leader and the king of kings, Krushnaji gifted the sword acquired by his father to Shivaji Maharaj on 7th March, 1659. Shivaji Maharaj, seeing the sword was certainly impressed and loved it immediately. He asked Krushnaji for its price, as a king was not supposed to accept free presents from his people. Krushnaji denied taking the money, but as Shivaji Maharaj insisted, he accepted 300 hun (as of today, 1 hun~ Rs. 2,40,000). Later Shivaji Maharaj named this sword as Bhawani.

Bhawani sword’s today’s minimum market price would be 300 hun i.e Rs. 7.2 crores.

It’s today’s location is unknown.

2. TULJA

The year was 1662. Shivaji Maharaj’s father Shahajiraje was on a tour of the Pune region. Citing the immense progress his son had been able to achieve as a Maratha king, he decided to gift him a sword. This sword was gifted to Shivaji Maharaj by Shahajiraje at Jejuri. This sword was named as Tulja.

It’s today’s location is unknown.

3. JAGDAMBA

Being impressed by the light weighing, swift, long and straight sword of Bhawani, Shivaji Maharaj decided to enable his soldiers with the same types of swords. So, he placed an international tender and asked the British, Dutch, Portuguese, French and the other European powers to accept the order. Almost every European power was well acquainted with the greatness of Shivaji Maharaj as a leader and saw in him a threat to their colonial ambitions. Hence, they denied to accept the order. But there was one European nation located in between France and Portugal, then not very strong economically as compared to its neighbours accepted the order. It was Spain.

main-qimg-64f318cf57a92c418e58f24b96c0fd77

The head of Spain accepted the order and thousands of European blades started to embark for India. Being overwhelmed by the vastness of the order and for trusting such a small country in the presence of strong European powers, the head of Spain gifted a brilliant, stone studded, exemplary and a stainless sword to Shivaji Maharaj. This was the Jagdamba sword.

In 1875, the British tactfully got hold of this sword from a descendent of Shivaji Maharaj and took it to England.

It’s today’s location is Royal Museum, London.

Sunday, February 4, 2018

Lost Treasure of Middle Age India - Peacock Throne

The Peacock Throne was a famous jeweled throne that was the seat of the Mughal emperors of India. It was commissioned in the early 17th century by emperor Shah Jahan and was located in the Diwan-i-Khas (Hall of Private Audiences) in the Red Fort of Delhi.

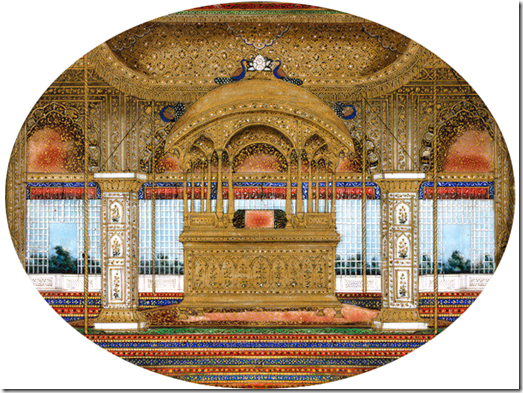
Sixteen_views_of_monuments_in_Delhi_Peacock_Throne_Red_Fort_Delhi_1850

How did it look

The descriptions of Lahori, from before 1648, and Tavernier's, published in 1676, are generally in broad agreement on the most important features of the thrones, such as its rectangular shape, standing on four legs at its corners, the 12 columns on which the canopy rests, and the type of gemstones embedded on the throne, such as balas rubies, emeralds, pearls, diamonds, and other coloured stones. There are however some significant differences between the two descriptions:

    Tavernier was allowed to closely inspect the throne and its jewels and wrote the most well known detailed description to date.

    In his account, Tavernier gave details of the design in which the balas rubies, emeralds, diamonds, and pearls were arranged on the four horizontal bars connecting the four vertical legs, from which the 12 vertical columns, supporting the canopy, arose. In the middle of each bar, a large cabochon-cut balas ruby was placed, surrounded by four emeralds forming a square cross. Smaller such square crosses were situated on either side of the central large cross, along the length of the bar, but arranged in such a way that while in one square cross a balas ruby occupied the center, surrounded by four emeralds, in the next square cross, an emerald was surrounded by four balas rubies. The emeralds were table-cut and the intervals between the emerald-and-ruby crosses, were covered with diamonds, also table-cut and not exceeding 10 to 12 carats in weight.
     There were three cushions or pillows upon the throne. The one placed behind the emperor's back was large and round; the other two, placed at his sides, were flat. The cushions were also studded with gems. Tavernier mentioned some royal standards and weapons that were suspended from the throne, such as a mace, a sword and a round shield, and a bow and quiver with arrows, all studded with gemstones.

Shah_Jahan_op_de_pauwentroon
    
     He counted the number of large balas rubies and emeralds on the throne. Accordingly, there were 108 large balas rubies on the throne, all cabochon-cut, the smallest weighing around 100 carats and the largest over 200 carats in weight. He counted 116 large emeralds on the throne, all of excellent colour, but with many flaws (a characteristic feature of emeralds), the smallest weighing around 30 carats and the largest around 60 carats.The underside of the canopy was covered with diamonds and pearls, with a fringe of pearls all round.
    
     On the side of the throne facing the court was suspended a diamond of 80 to 90 carats in weight, with rubies and emeralds surrounding it. When the Emperor was seated on the throne, this suspended arrangement of jewels was in full view in front of him.Tavernier then wrote about two large gem-studded royal umbrellas, which were not part of the throne, but were placed on either side of the throne, at a distance of 4 feet from it. The central stems of these umbrellas, 7 to 8 feet long, were covered with diamonds, rubies, and pearls. The cloth of the umbrella was made of red velvet, and embroidered and fringed all round with pearls. The height of these umbrellas might give an indication as to the height of the throne, which was probably of the same height. Thus, the height of the throne would have been around 7 to 10 feet.

    What was the last know place of the throne

771px-Nadir_Shah_on_the_Peacock_Throne_after_his_defeat_of_Muhammad_Shah._ca._1850,_San_Diego_MOA
    
     After Nader Shah looted the original, another throne was made for the Mughal emperor. Along with the Peacock Throne, Nader had also taken the fabulous Koh-i Noor and Darya-i Noor diamonds to Persia, where some became part of the Persian crown jewels, and others were sold to the Ottomans. The plunder taken by Nader was so great that he stopped taxation for 3 years. The bottom half of the Peacock Throne might have been converted into the Sun Throne also a part of the Persian crown jewels. Various 19th-century Indian paintings of this later throne exist. It was located in the Diwan-i-Khas and might have been smaller in size than the original. However, the appearance would have been similar, based on either the original plans or from memory and eye-witness accounts. The replacement throne was made out of gold, or was gilded, and was studded with precious and semi-precious stones. Just like the original, it featured 12 columns. The columns carried a Bengali do-chala roof, which was graced with two peacock statues on the two ends, carrying pearl necklaces in their beaks, and two peacocks at the top, also carrying pearl necklaces in their beaks. The two lower peacocks were in the center underneath a flower bouquet made out of jewels, or under a royal umbrella. This throne was protected by a canopy made out of precious and colorful textiles, and gold and silver threads. The canopy was carried by four slender columns or beams made out of metal. Underneath the throne, colorful and precious carpets were laid out

Tuesday, January 30, 2018

How to convert old laptop to Chromebook

Tired of your old laptops or having old laptops that are way to slow and not getting good price to seller. Well! I've a better options for you .How about re-using you old laptop(Technically, Most of the laptop) by converting it to chromebook.

Laptopimage

A few heads-up before you install

This won’t work on all computers. While CloudReady should work on most Windows and Mac laptops and desktops made since 2007, it’s impossible to guarantee it will work on everything. You can check out a list of tested hardware, as well as basic system requirements here. Chromium OS is generally designed to run on light hardware, so even if you have an old machine with dull specs, this may breathe new life into older hardware.

This will wipe your system. At the moment, there is no way to dual-boot CloudReady’s Chromium OS with another operating system, like Windows. Make sure you’re installing this on a device that you can fully erase. Don’t install this on your primary machine. Be sure to back up any data you want to keep before continuing.
    
This isn’t perfect Chrome OS. While Chromium OS is mostly identical to Chrome OS, there are still a couple key differences. Most importantly, you won’t get regular, automatic updates or any official support. It also doesn’t come with Flash built in, but CloudReady will give you instructions on how to install it manually the first time you boot.

turn-laptop-into-chromebook-cloudready-installation

Things you needed before you start off

1.Old Laptop

2.An 8GB or 16GB USB stick: Yes, only those two. According to CloudReady, any size larger or smaller than this could cause problems.
3.The CloudReady .bin file: You’ll need to download CloudReady before you begin. You can find the free application here. Click “Download CloudReady” at the top of the screen and save it to your computer.
4.Chromebook Recovery Utility: This tool allows you to create a USB install stick using the CloudReady software. You can find it here and install it on any computer.

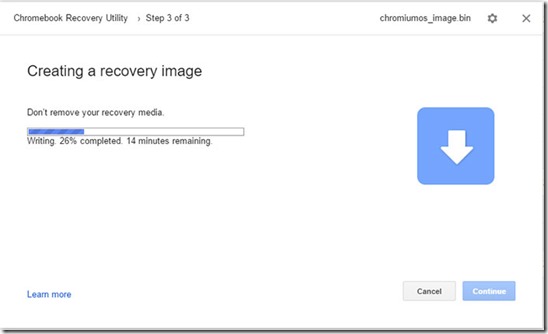
turn-laptop-into-chromebook-cloudready-local-image


To create the USB installation stick, follow these steps:

    1.Launch the Chromebook Recovery Utility.
     2.Click the Settings gear icon in the top-right corner of the app once it opens.
     3.Select “Use local image.”
     4.Choose the CloudReady .bin file you downloaded from Neverware.
     5.Insert the USB stick into your computer.
     6.Select your USB stick on the left side of the Chrome Recovery Utility app screen.

turn-laptop-into-chromebook-cloudready-recovery-utility-installation

Monday, January 29, 2018

How to shred all you phone data effectively

Since we are in the age of electronics where  every single day a new mobile is getting released.Many a times we are so tempted on the new features the gadget support and we need to buy them.Some of them sell the phone in exchange , some tend to sell it to outsider and Others try it have for them.This article intends on focusing people who choose to exchange or sell it to outsider.How to prevent your data been misused.

index

The solution is very simple.

1.Remove your memory card

memory_card_insert_card

On the Home screen, tap Apps → Settings → Storage → Unmount SD card. To remove the memory card, follow these steps: Step 1: Insert the ejection pin into the hole on the memory card tray to loosen the tray. Step 2: Pull out the memory card tray gently from the memory card tray slot.

2.Factory Reset Your Phone.

androidreset

Nexus 6P
1.Tap the Settings icon from your home screen or app drawer.
2.Swipe up to scroll down to the bottom of the settings menu.
3.Tap Backup & reset.
4.Tap Factory data reset.
5.Tap Reset phone.
6.Tap Erase everything

Samsung Galaxy S7
1.Tap the Settings icon from your home screen or app drawer
2.Swipe up to scroll down to the bottom of the settings menu.
3.Tap Backup and reset.
4.Swipe up to scroll down
5.Tap Factory data reset.
6.Tap Reset phone.
7.Tap Erase everything.

Xiaomi Phones
1.Turn your phone on and unlock it.
2.Go to the Settings app.
3.Head to Backup & reset.
4.Tap on Factory data reset.
5.Select Reset device.
6.Tap on Erase everything.
7.Confirm by pressing OK.

Sunday, January 28, 2018

How to mine Crypto currency Using a Mobile phone

If you cannot afford a high hardware price to start mining , you can always start mining with something which is less expensive like your old Android mobile phone which you hand thrown away for sometime.However they may not be generating much of revenue ,but its always to good to get something from nothing isn't it.It would be really good if you had 2 or more old android phones to start with.

mobile-Minergate-600x180

CPU mining is an exclusive for Cryptonote algorithm because it does not use ASIC computers and in some cases it does not use GPU, so mining is easier and you can do it on any PC, Mac, Linux, Android Tablet or Android Smartphone.

To do this you need to install the app from the following link on Google Play here.Before that you need to sign up In MinerGate

mobile-mining-Minergate

The app is designed to choose three mining difficulties that range from the lowest to the highest and this implies more or less energy consumption. The app can be used on any Android device.

The Highlight Features

    1.You can mine from your mobile device.
     2.Check connected devices and balances.
     3.Chat with other miners at MinerGate in your language.
     4.Connect to your MinerGate account.
     5.Withdraw coins from your account.
     6.Check cryptocurrencies prices
     7.Buy and control your Cloud Mining contracts.
    
For test run, I ran this app with my Old Moto G3 Mobile phone and was able to get a hash rate of 12-15 H/s.With my latest One plus 5T I was able to run upto 20-28 H/s.But what I also saw that the battery started to drain faster because of the CPU Utilization.So I suggest you the connect a Charger if you are planning to run non-stop.


Here are the options available:

    log in to your MinerGate account
     choose the currency to mine by clicking on the coin’s name
     start mining


We can have it installed and monitor the activity for the mining operations doing in other PC or mobile or Tablets through one account in your mobile phone.

The community is so large that you can find chat rooms for every language you need. It has supports from Spanish, English, Russian, Italian and more.

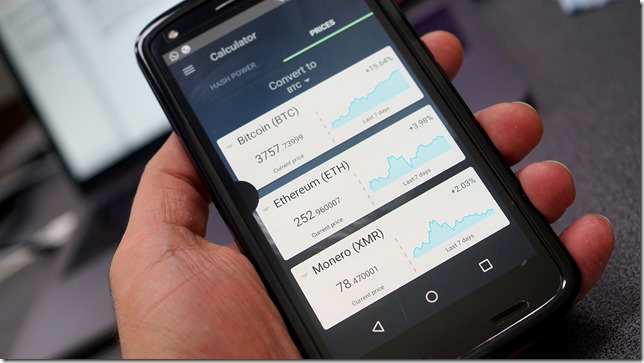
MinerGate app has a calculator that can help you to get an idea of how much H/s you need to see the reward in each of the coins you want. As well as the current prices of each of the currencies graphically. This is a necessary tool to evaluate the competitiveness of each currency.One of the advantages of the app, that many of the community of miners in the world like is the reward by recommendation program.

The mechanic of this program is if you share a link with your family or friends and they register through that link you can receive rewards.

The tool that I liked the most is the status bar of unconfirmed, it is a graphical way to know your goals in the short term, so you can focus more on one currency versus another currency that needs more time to undermine it. This bar is only available in the app. The desktop version only shows “pending to confirm” number.

It´s an effective way to control and monitor your miners remotely, either using the MinerGate platform or other console mining platforms like CPUMiner-Multi, Yam miner, ccminer-cryptonight.

Last but not least is the support of languages available in English, Portuguese, Traditional Chinese, Simplified Chinese, Indian and Russian. Everything including menus in the language you need.

“The future is now and you are living the birth of a new monetary system based on technology. Discover it!”

Hardware and Software guide for Cryptocurrency Mining

What is cryptocurrency mining?

People who are running software and hardware aimed at confirming transactions to the digital ledger are cryptocurrency miners. Solving cryptographic puzzles (via software) to add transactions to the ledger (the block chain) in the hope of getting coins as a reward is cryptocurrency mining.


crypto-mining-2

How do I start mining Cryptocurrency?
Well its quite simple, you need to have the following things for you to start mining

NOTE:Mining Bitcoin/Ethereum is way to expensive since the difficulty is way more than it used to be few years back, I would suggest other ALT-Coins like Monero,Litecoin,Z-cash etc.


1.Hardware
Which may vary from a normal PC to Mining RIG(Purely depends on what and how you would want to start).We can start mining with normal PC with a simple CPU and if possible GPU(If you want earn something) or if you able to afford to build a Rig , which would simply mean investing from 200$ to maybe 5000$ you can build a rig.But the more you invest the more you have the chances to get back the money you invested sooner.

If in case you are up for building Rig these are my suggestion


Best CPU for CPU Mining
Intel based
1.Intel Pentium G4400 Skylake Dual-Core 3.3GHz Desktop Processor

2.Intel G3900 Dual Core - LGA1151 - 51watt Low TDP Processor

3.Intel Core i3-6100 6th Gen LGA 1151 Processor

AMD Based

4.AMD Ryzen 5 1600

5.AMD RYZEN 7 SERIES OCTA CORE PROCESSOR 1700

6.AMD Ryzen 7 1800X Processor


Best GPU for Mining

I've listed out some of the Best GPU for Mining, there may be many more models

AMD GPU

1.ASUS ROG Strix Radeon RX 560 4GB

2.Sapphire Radeon R5 230 Graphic card 1GB DDR3

3.Gigabyte AMD Radeon R7 240 2GB DDR3

4.ASUS Radeon RX 560 4GB GDDR5

5.Sapphire Radeon RX 460 4GB

6. Radeon NITRO+ RX 570 4GB

7.RX VEGA 56 8G – Latest and Best


NVIDA GPU

1.Zotac GT 710 2GB DDR3

2.MSI GeForce GTX 1050 2GT

3.Gigabyte Geforce GTX 1050 Ti G1 Gaming 4G

4.ZOTAC GeForce GTX 1050 Ti mini, 4GB GDDR5

5.Zotac Amp Edition GeForce GTX 1060 6GB

6.ASUS Geforce GTX 1050 Ti 4GB Phoenix Fan Edition

7.ZOTAC GeForce GTX 1070 ZT-P10700B-10P 8GB DDR3


Best Mother boards for mining

1.GIGABYTE GA-H110-D3A

2.ASUS LGA1151 DDR4 HDMI B250

3.ASRock H81 PRO BTC R2.0 LGA 1150


What should be my power supply for mining rig ?
You can use any Power supply unit ranging from 450 Watt to 1200 Watt, The more power supply more number of GPU you can support

1.Corsair VS450 450-Watt Power Supply

2.Corsair RM Series RM550 550W

3.Corsair VS Series VS650 650 Watt

4.Corsair RMx Series RM750x 750W

5. CORSAIR RMx RM1000X 1000W

6.CORSAIR HX Series™ HX1200-1200 Watt


ASIC Mining using Ant Miner
All of the below listed are the only hardware that you may get back your money back.
1.S9 AntMiner-Bitcoin Miner(BTC)
2.DragonMint 16T(BTC)
3.T9 Antminer(BTC)
4.AntMiner R3 (BTC)
5.ANtMiner U3(BTC)
6.D3 AntMiner -DASH coin Miner


If you are  looking for Mining Combo then the below pick for starters

1.Entry Level Mining Combo - Asrock H81 Pro BTC Mining Board + G1840 Processor + 8GB DDR3 Memory + 64GB SSD + Pack of Six Riser Cables


Softwares used for Mining

Mining Pool
1.Single Mining -Command prompt (Nanopool is my personal Favourite )

2.GUI based -

1.Nice hash
2.MinerGate
3.WinMiner


Wallets
Wallets for Investing as well as receiving CryptoCurrency
International users
1.Coinbase - You would free 10$ once you join. 


Indian user
2.Zebay - You would get free 100 Rs once you sign Up.
3.Koinex - You would get free 100 Rs once you sign Up.

Only for Deposit and wallet
Exodus
JAXX

Apart from this we do have Other Pools also , but make sure which  one would be better before you join Other Pools Details

If you Like this Article,Please share ,comment and subscribe to this page.

We accept donations:

BTC:338fJGmZtUYM88fRex81uqJfQ3ZvdkdvgK

ETC:0xD9010f531c7e134b03337cd3e4223e9a4b457E35

ETH:0xB1fb3179EC7600B093F3B2babF9D98Dfb0694a8d

Saturday, January 27, 2018

La Tomatina :The Tomato Festival

la-tomatina-1-728

Where is La Tomatina held?

La Tomatina tomato fight festival, Buñol, Spain. La Tomatina is a food fight festival held on the last Wednesday of August each year in the town of Buñol in the Valencia region of Spain. Tens of metric tons of over-ripe tomatoes are thrown in the streets in exactly one hour.

tomatina

When is La Tomatina Celebrated in Spain?

La Tomatina is celebrated on the last Wednesday in August in the small town of Bunol in eastern Spain. This year the festival takes place on August 27th, 2014. The festival began way back in 1944 but there is no known religious or political basis for it.

SPAIN/

What is the History of La Tomatina Festival?

La Tomatina started on the last Wednesday of August in 1945 (29th August 1945) when some young people went to the town square to attend the Giants and Big-Head figures parade. They decided to join the parade with a musician. The group's excitement caused a person to fall from the float. The participant flew into a fit of rage and started to hit everything in his path. There was a market stall of vegetables that fell victim to what soon became a furious crowd. People started to pelt each other with tomatoes until local law enforcement ended the battle.

123126384

The following year the young people deliberately repeated the fight on the last Wednesday of August, only this time they brought their own tomatoes from home. They were again dispersed by the police. The food fight became an annual event. In 1950, the town allowed the tomato hurl to take place, but the next year it was stopped again. Many young people were imprisoned but Buñol residents forced authorities to let them go. The festival gained popularity with more and more participants every year. In subsequent years it was banned again with threats of serious penalties. In the year 1957, some young people celebrated "the tomato's funeral", with singers, musicians, and comedies. The main attraction however, was a big tomato in a coffin carried around while a band played funeral marches. In 1957, demand for the popular festival led to its becoming official, with certain rules and restrictions. These rules have gone through many modifications over the years.

maxresdefault

Another important landmark in the history of this festival is the year 1975. From this year on wards, "Los Clavarios de San Luis Bertrán" (San Luis Bertrán is the patron of the town of Buñol) organized the whole festival and brought in the tomatoes, which had previously been brought by the local people. Soon after this, in 1980, the town council took over responsibility for organizing the festival.

La-Tomatina-Festival-spain

Since then, the number of participants has increased year after year as well as the excitement about La Tomatina Festival. In 2002, in the month of August La Tomatina of Buñol was declared a Festivity of International Tourist Interest by the Secretary Department of Tourism due to its success. In 2013, town officials introduced an entry fee and limited the number of participants, citing concerns over safety.

The city council follows a short list of instructions for the safety of the participants and the festival:

  1. The tomatoes have to be squashed before throwing to avoid injuries.
  2. No other projectiles except tomatoes are allowed.
  3. Participants have to make way for trucks and lorries.
  4. After the second shot indicative of ending the tomato hurl, no tomatoes should be thrown.